
Fading a sound in from silence, or fading it out to silence, or fading an image in from darkness, or fading it out to darkness--these are commonly-occurring gradual transitions of the sort discussed in the previous lesson on linear change. To give the sense of gradual change between one value and another, which we abstractly called point A and point B in the previous lesson, we need for the program to calculate intermediate values to create a linear transition. In the previous example, the transition was a simultaneous linear change in pitch (MIDI key number, from low to high) and loudness (MIDI velocity, from high to low) of musical notes. Now we'll do the same thing with loudness of a sound and brightness of an image.
This program shows an automated fade-in of sound and image by means of linear interpolation.
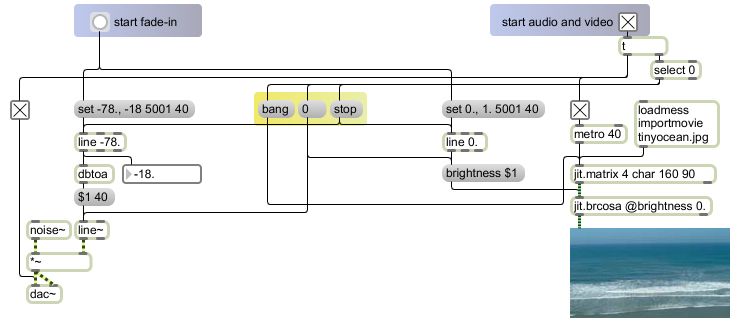
For this program to work properly, it needs to be able to access a particular (very small) image file. You should download the file tinyocean.jpg and place it in the same folder as the program file.
Whereas the previous examples on linear interpolation used the objects clocker and expr to calculate linear progressions of values, in this example we take advantage of the Max object line, which does essentially the same thing but takes care of some of the math and programming tasks for you. The line object outputs a linear progression of values that arrive at a specified destination value in a specified amount of time. It receives in its inlet a destination value (the value at which it should eventually arrive), a transition time (how long it should take to get to the destination value), and a time interval (how often it should send out an intermediate value as it progresses toward the destination. It takes care of the scheduling of output and stops when it reaches its destination. [N.B. The line object has a slightly quirky way of calculating timing, which you should be aware of. You can read about it in the "line_timing_tricks" subpatch of the line object's help file.]
Some of the earlier lessons have used MSP audio, but this is the first one that uses Jitter visual display. (MSP object names all end with the ~ character and Jitter object names all begin with the jit. prefix. MSP objects calculate a constant stream of audio samples, and Jitter objects store and process and display multi-dimensional arrays of data (one of the most common of which is a two-dimensional array of color data to display a still image or a frame of video). For MSP audio to work, MSP must be turned on explicitly somewhere in the program; and for time-varying images to be displayed in Jitter, the data must be continually sent to a display wihdow, usually triggered by a metro set to a fast tempo (less than or equal to the desired frame rate). This is explained in the very first chapter of the MSP and Jitter tutorials that come with the Max program. That's what the toggle switch in the upper-right corner of the program does; it starts MSP audio via the dac~ object and starts a metro that triggers repeated recalculation and display of the image. The metro and dac~ objects both need to be turned on for the program to work.
When the audio and video are turned on, we don't hear or see anything because the amplitude of the sound is turned to 0 (the default value of the line~ object is 0) and the brightness of the image is set to 0 (with the @brightness 0 attribute typed into the jit.brcosa object. The image is automatically loaded into a Jitter matrix (the jit.matrix object) when the program is loaded. So everything is initialized correctly automatically when the program is opened. Once the audio and video has been turned on, MSP is calculating audio, but all the samples end up being 0 (because the *~ object is multiplying every sample by 0); and Jitter is calculating the video display at a rate of 25 fps, but all the pixels end up being black (because the jit.brcosa object is multiplying every pixel by 0). To fade the sound and image in, then, we just need to create a gradual progression of values that increase upward from those initial 0 values.
When you click on the button, it triggers two messages to the line object that will change the brightness of the image. The first message, set 0., resets line internally to that value. The second message, which comes immediately after, 1. 5001 40, says "Go toward 1, arriving there in 5001 milliseconds, sending out an interpolated value between 0 and 1 every 40 milliseconds." Since 40 ms is the same periodicity as the metro, every "frame" of the video display will have a slightly greater calculated brightness over the course of 5 seconds, till it reaches a full brightness of 1. (Every pixel in the image gets multiplied by the brightness factor each time.) At practically the same time, two messages are sent to the line object that will change the loudness of the sound. The first message resets line internally to a value of -78, and the immediately ensuing message tells line to go toward -18 over the course of 5 seconds, sending out an interpolated value every 40 ms. These values are treated as decibels of amplitude, and are converted into actual linear amplitude values by the dbtoa object. The line~ object is similar to line, in that it requires a destination value and a transition time; however, it does not require a time interval for reporting, because it interpolates constantly for every single audio sample (i.e., at the audio sampling rate).
The three message boxes in the yellow panel are for "clean-up": for resetting things when the audio and video are turned off by the toggle at the top of the program. The select 0 object detects when the toggle has been turned off, and triggers a stop message to both of the line objects, just in case they are in progress, a 0 message to reset the amplitude and brightness values to 0, and a bang to trigger the image once more (with the brightness of 0, thus displaying a black screen). This clean-up makes sure everything truly is (and looks, and sounds) turned off.
Both in the case of brightness and the case of loudness (amplitude), multiplying by some number scales the value; multiplying by 0 reduces everything to 0, multiplying by some number greater than 0 but less than 1 reduces it to less than its normal amount, multiplying it by 1 leaves it alone, and multiplying it by a number greater than 1 will increase it.
There is an aspect of our perception of audio that complicates matters a bit, which is that we actually perceive loudness and pitch subjectively as the logarithm of relative amplitude and frequency. That is to say, our perception of sound intensity and musical pitch requires that the amplitude and frequency change in a geometric progression (i.e. multiplicatively) in order for us to perceive the change as an arithmetic progression (i.e. additively). We'll discuss this more in future chapters. For now, it's enough just to note that when we are concerned with the perceived loudness of a sound, it's often best to discuss its amplitude in terms of decibels (a logarithmic formula for characterizing relative amplitude). That's what the dbtoa object does for us; it allows us to make a linear progression stated in decibels and calculates an appropriate exponential increase in amplitude.
Just to illustrate, -78 decibels is equal to an amplitude of 0.000126, and -18 decibels is equal to an amplitude of 0.126. So in our fade-in of the noise in this example, the amplitude increases by a factor of 1000 (but by an additive difference of 0.125874). If we make a linear progression in decibels from -78 to -18, when we're halfway there we'll be at -48 dB, which is an amplitude of 0.004. Although that's much less than halfway to 0.126 arithmetically, 0.004 has the same ratio relationship to 0.000126 as 0.126 has to 0.004, so we're halfway there in terms of perceived loudness. If, on the other hand, we made a straight linear progression in amplitude from 0.000126 to 0.126, at the halfway point we would be at 0.0628, which is half the amplitude we are heading for, but is 500 times the amplitude at which we started! In other words, over the first half of the period of time, the amplitude would increase by a factor of 500, but for the second half of the period of time it would increase by a factor of only 2. We would hear a very substantial change in the first half, and very little change in the second half. The decibel scale corresponds much more closely to our subjective perception of a sound's intensity, and thus gives us a fade-in that feels more linear to us.
And finally, an aesthetic observation about the relationship of sound and image. The white noise (total randomness of audio samples) produced by the noise~ object is related to the noise made by the turbulence of ocean waves. Its not exactly the same, of course, but when the sound and the image are juxtaposed, and are further linked by the way they fade simultaneously, the visual image may influence us to feel that the noise is somehow ocean-like (even though it was not produced by an ocean) and the sound may serve to enhance the evocative appeal of the image. When two things are juxtaposed, our tendency is to think about their relationship, which sometimes includes finding relationships that may not in fact be there.
1 comment:
genç porno
Post a Comment